Cool Pi Cm5-Laptop Linux Quick Start Guide
-
Machine Introduction
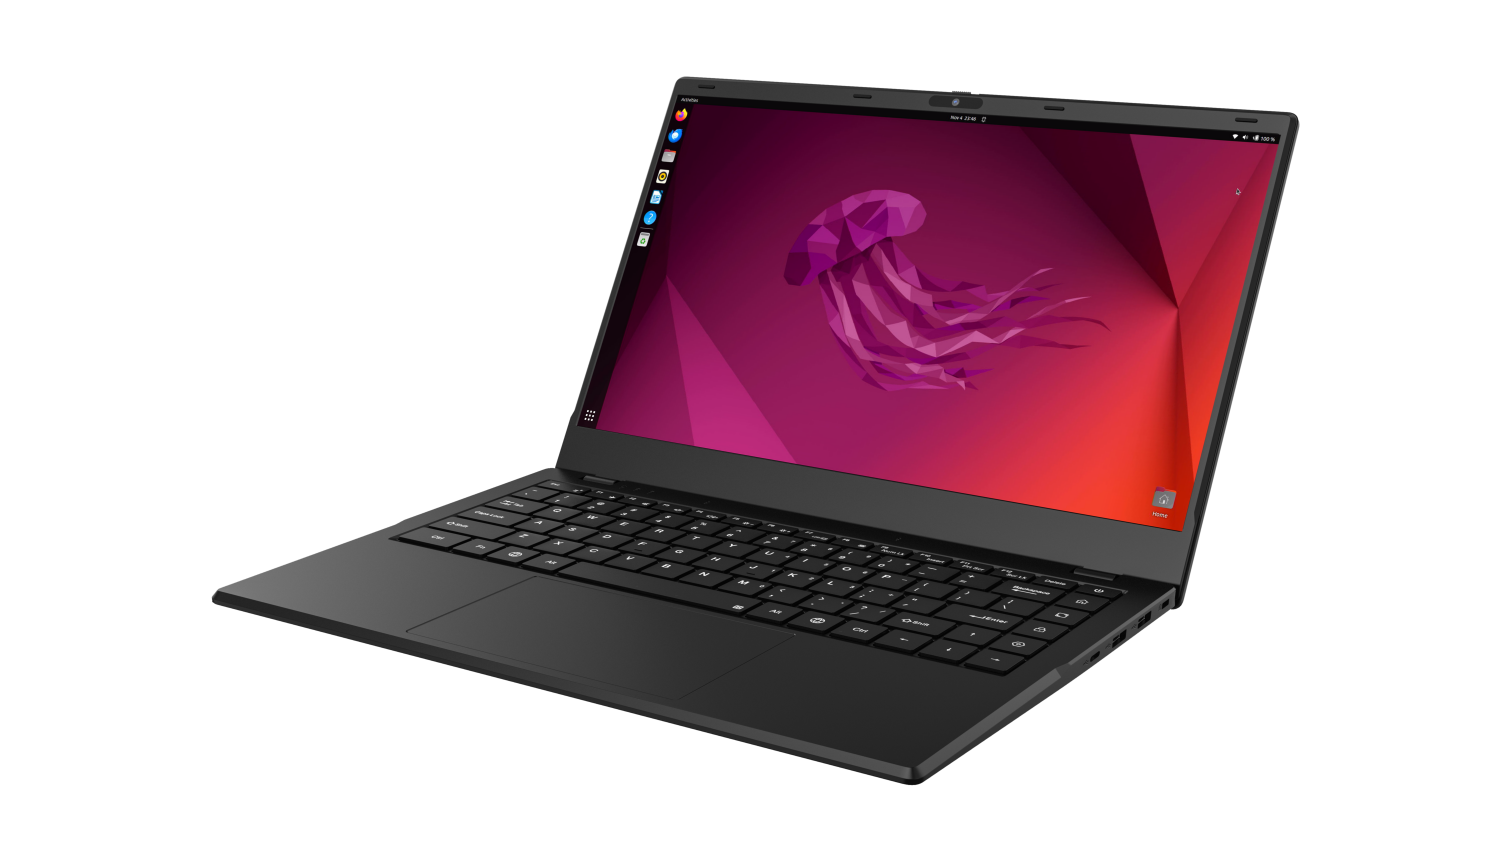
COOLPI CM5 open-source notebook is a product that combines high performance, portability, and open-source spirit. It not only meets the basic computing needs of users, but also provides an ideal platform for those who enjoy free exploration and technological creation.
Installing the system
The machine is installed with Ubuntu 22.04 system by default at the factory. If users need other versions, they can update them according to the following tutorial.
The default username for the machine is: coolpi Password: 123Download image
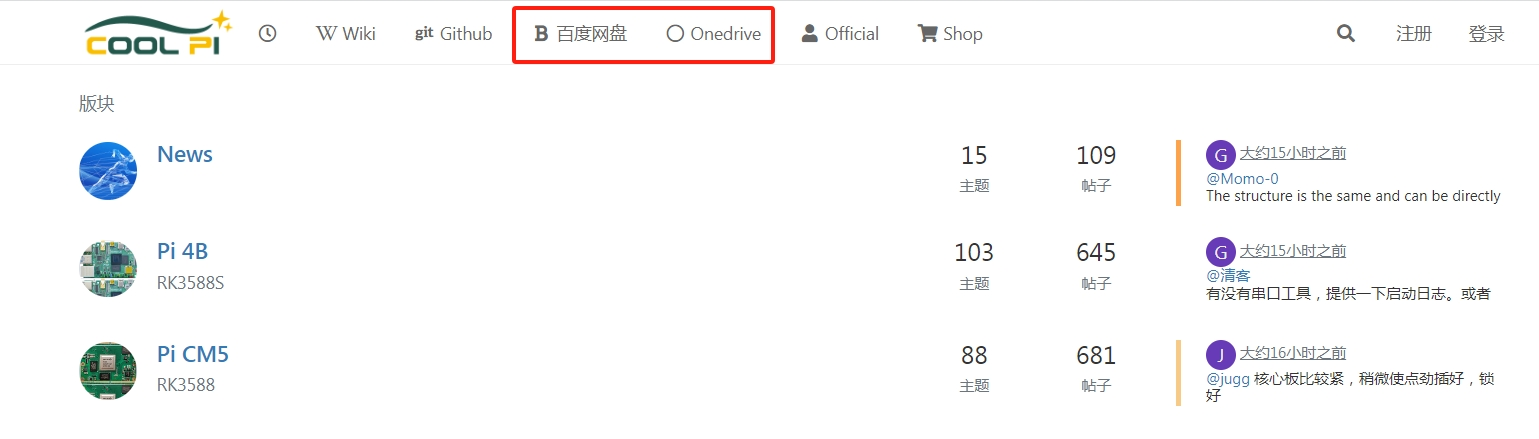
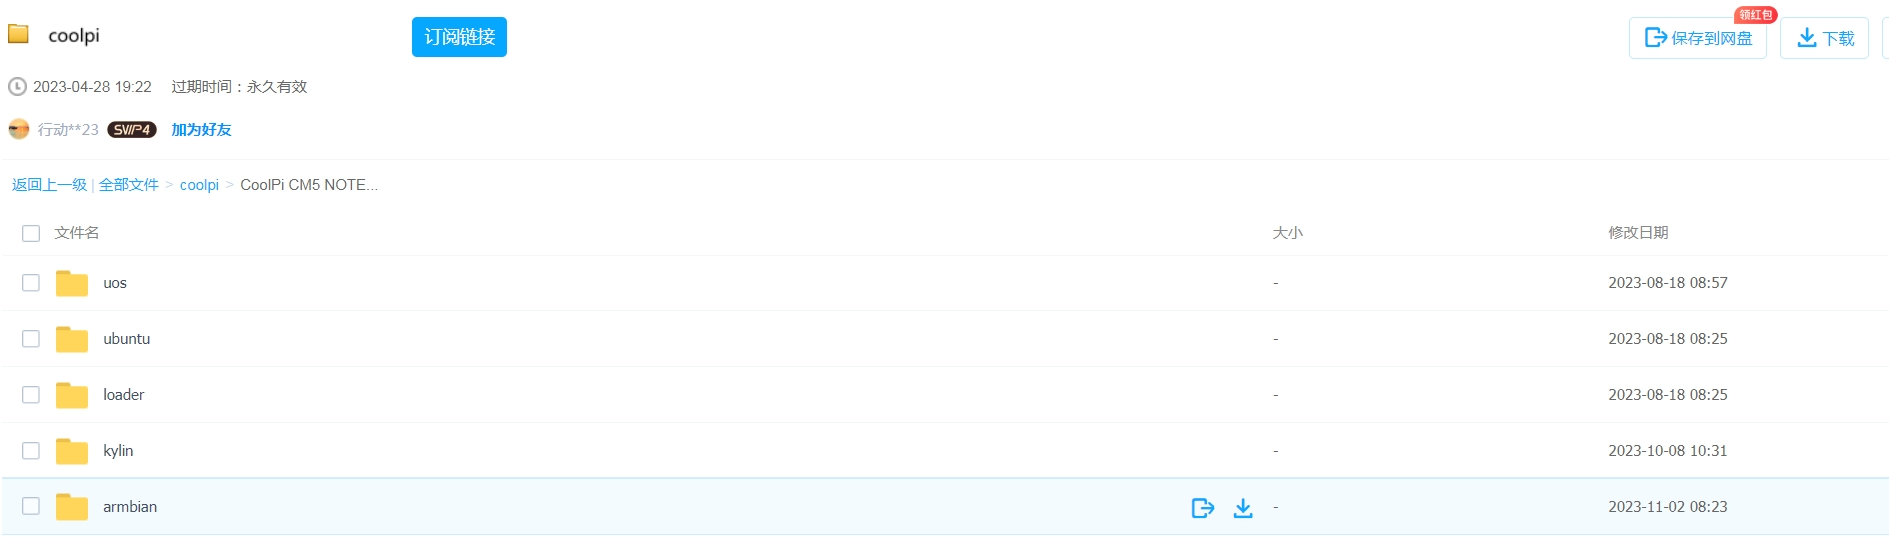
As shown in the following figure: System images can be downloaded through 百度网盘 or Onedrive.
Select the image that needs to be updated, and the image type will continue to be updated.
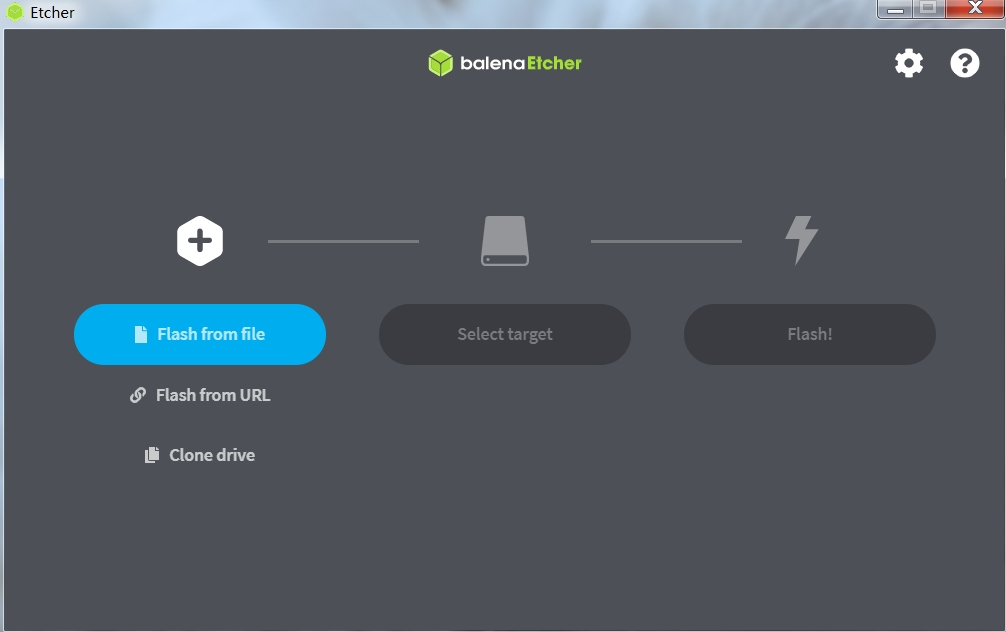
Download tools
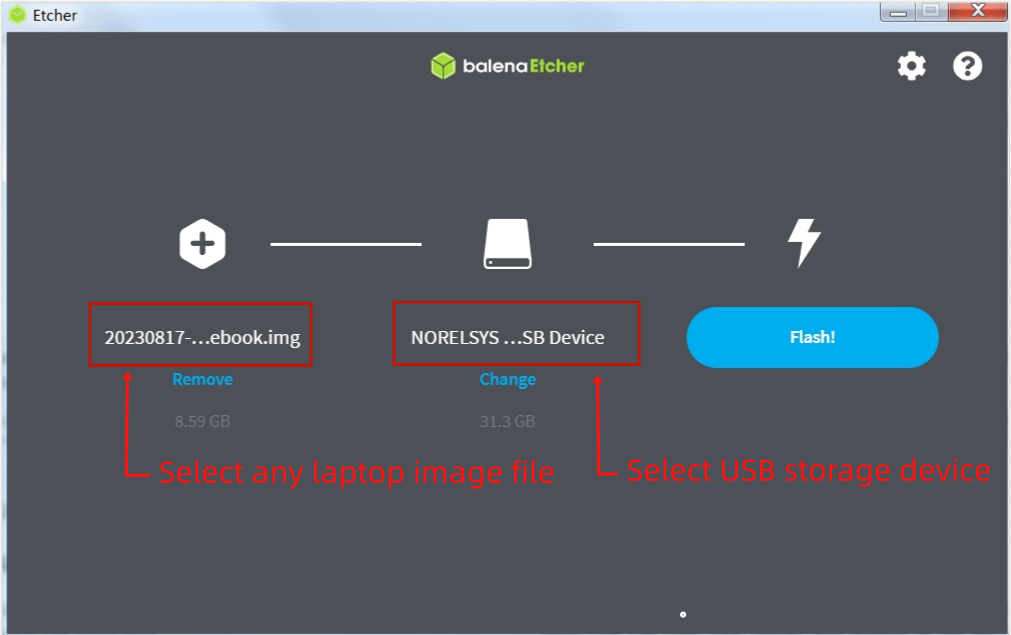
Coolpi defaults to using Etcher to update system images, which can be obtained through Baidu Cloud, Onedrive, or the official website.
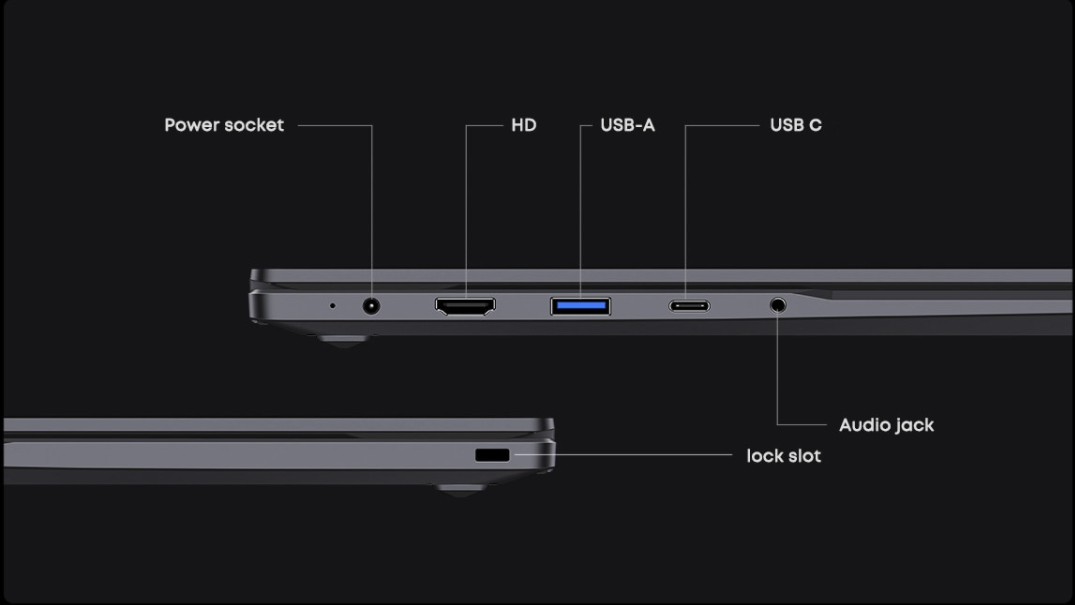
Machine enters UMS mode
The Type-C port of the machine is connected to the computer. When the Coolpi laptop is turned off, it can quickly press the power button multiple times, usually no less than 8 times, and the machine will enter MUS mode. The computer will recognize an icon for a USB drive. As shown in the following figure:
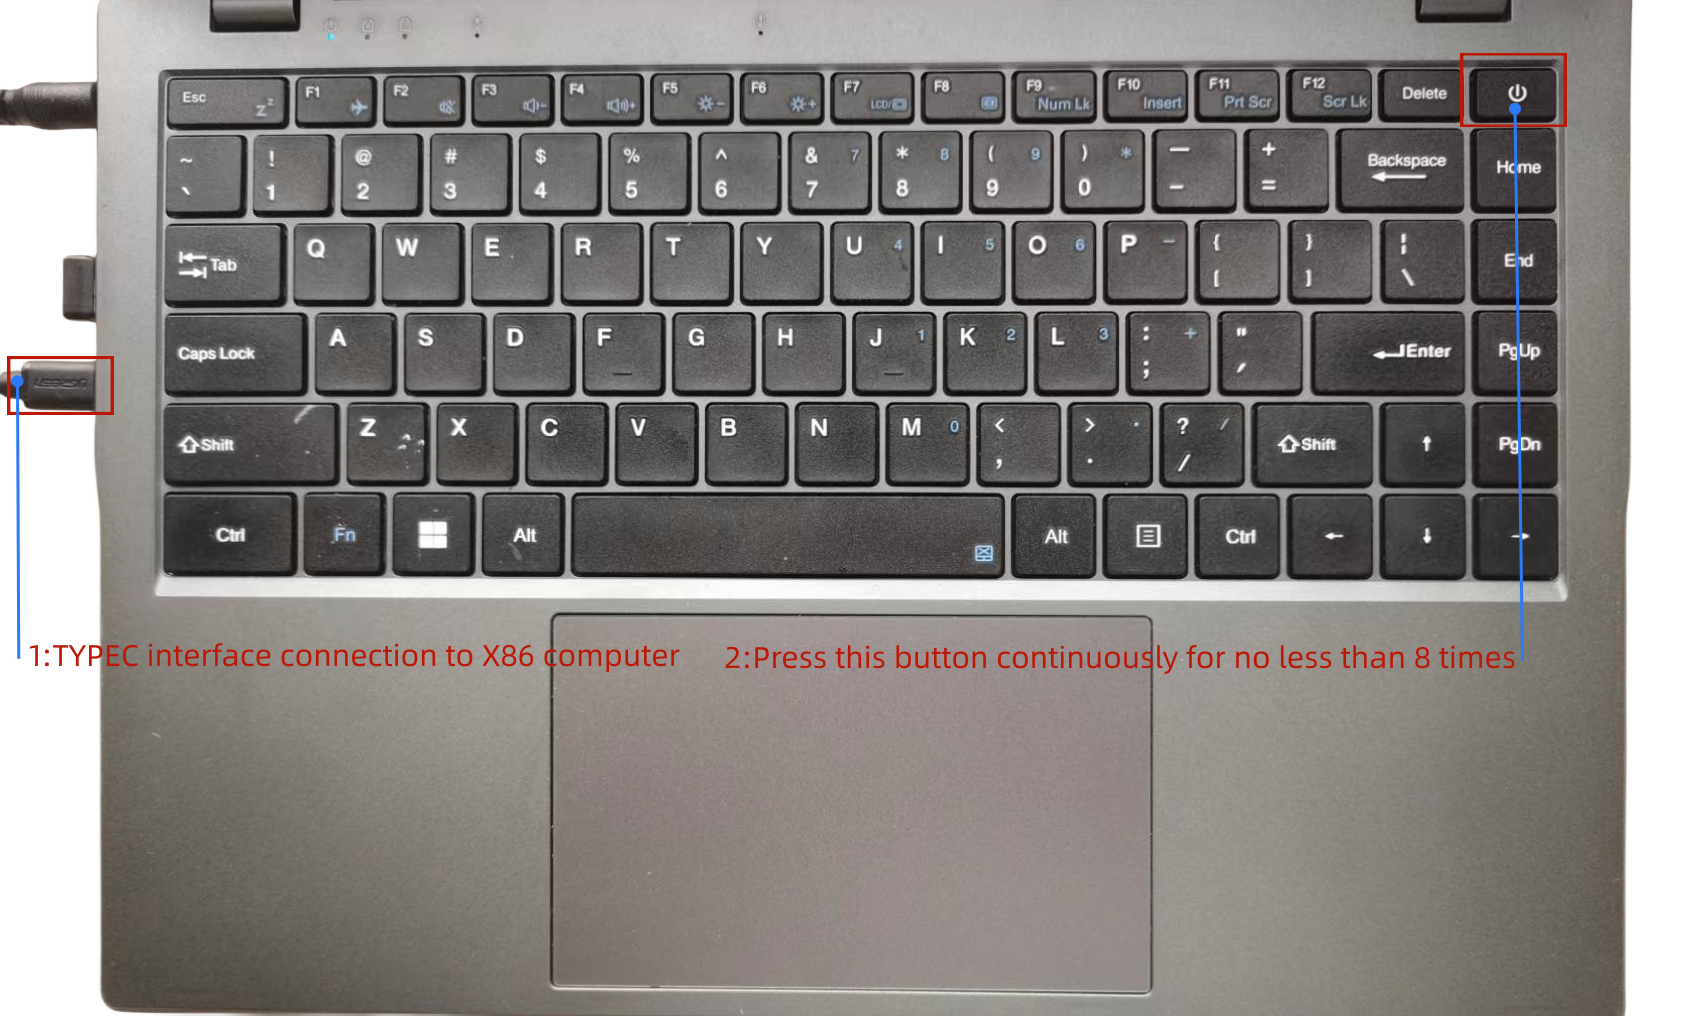
The X86 computer will recognize a UMS device.
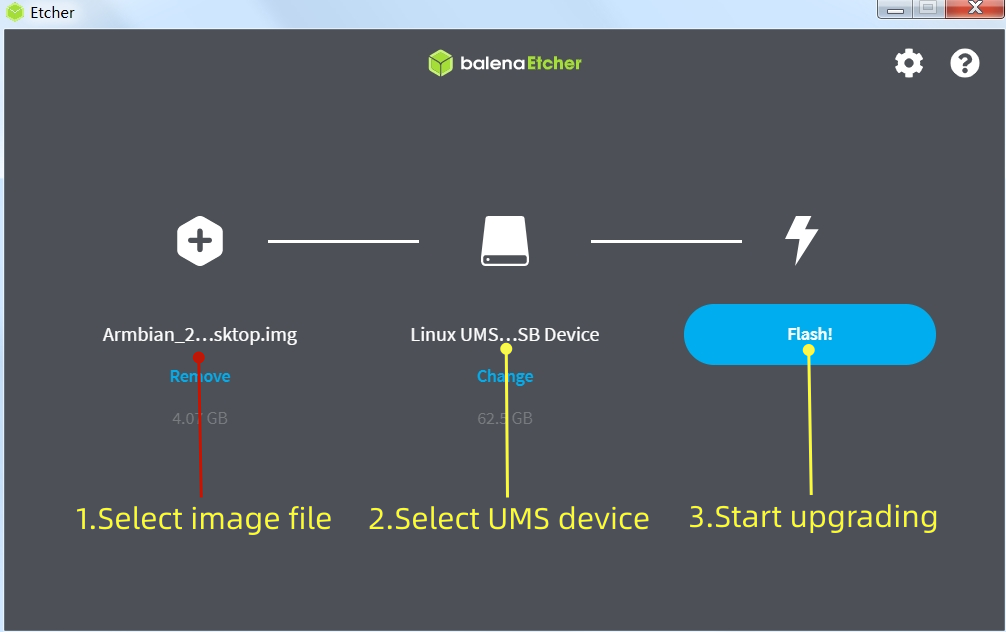
Load image and flash
Follow the three steps shown in the figure to burn the image file. After the burning is completed, a forced restart is required. The method of forced power down is to continue holding down the power button for 10 seconds.
After downloading, restart the machine as shown in the following figure.

Update kernel
The kernel of Coolpi will continue to be updated, and users can also compile the mainline kernel themselves to upgrade the machine, following the steps below. The compilation of the kernel part in the following figure is completed on the Coolpi laptop, and users can also cross compile on the X86 computer. The method and steps are the same.
Synchronize kernel
sudo apt-get update
sudo apt-get upgrade
sudo apt-get install git
git clone https://github.com/yanyitech/coolpi-kernel.git
Compile kernel
First, install the git toolkit, and it is best to update the system to the latest version before installation. Install some kernel dependent packages, then run the compilation script, enter numbers to select the corresponding machine model, and the compilation can proceed normally.
sudo apt-get install flex bison libssl-dev
sudo ln -s /usr/bin/python3.10 /usr/bin/python
cd coolpi-kernel
./build-kernel.sh
Welcome to using Coolpi Development Board!
------------------------------------------
Please enter a number to select your machine

1. cp4b
2. cp4b-hdmi-in
3. cm5-evb
4. cm5-evb-v11
5. cm5-minipc
6. cm5-notebook
7. cm5-notebook-v20
8. cm5-8uart
9. cpnano
10. exit

Enter option number: 7
Upgrade machine kernel
After the normal compilation of the kernel, an out folder will be generated with the directory, which contains all the files required by the kernel. You can update the newly compiled kernel to the machine by using the following command.
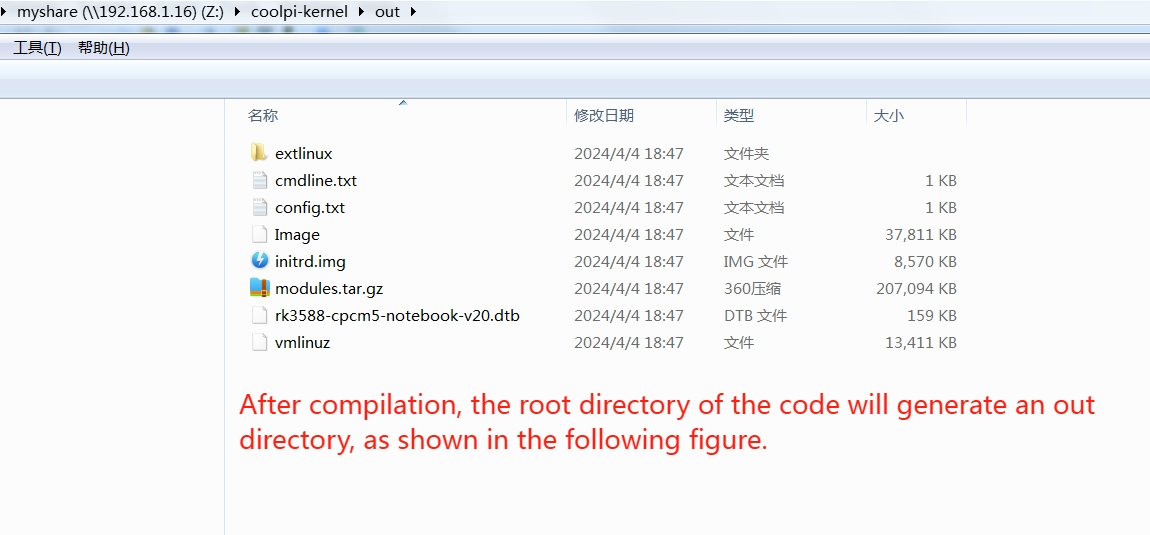
Use the following command to update the kernel.sudo cp ./out/* /boot/firmware -R sudo rm /lib/modules/* -R sudo tar -zxvf ./out/modules.tar.gz -C /lib/ sync sudo rebootIf the kernel was cross compiled using X86 machines, the kernel can be updated using the following methods:
- Use the Samba shared folder to copy the compiled files to the Coolpi machine.
- Use mobile storage devices such as USB drives to copy.
- The coolpi machine enters UMS mode, connects to the X86 computer, enters the USM mobile disk, deletes all files, and copies all files in the generated out directory to the UMS mobile disk. Then force a restart of the Coolpi laptop.
Change the startup logo
Users can update the startup logo of the machine by copying files, using the following command.
sudo cp ./logo.bmp /boot/firmware
sync
sudo reboot
Below is a standard format for a logo file that users can download and modify. Please note that the pixel size, name, and format of the file should not be changed.
logo.zipFrequently asked questions
The machine cannot enter UMS mode
Due to incomplete image updates, the partition table of EMMC is damaged, and the machine cannot enter UMS burning mode. The following methods can be used to repair the EMMC partition table.
- A USB interface mobile storage device with a capacity of no less than 16GB, and an X86 computer can burn any image to the USB device through ETCHER software.
- Insert USB storage device into the USB interface of the Coolpi laptop

- The machine will first start from the USB storage device when turned on. Then enter the system. Format EMMC using the following command.
sudo mkfs.ext4 /dev/mmcblk0 -
Pinned by G george
-
I followed the kernel update instructions (git clone, compile, copy, reboot) and now I have no network interfaces and no bluetooth. I don't have time to dig into it right now, just wanted to warn that something may be missing in the instruction.
-
@enok71
Please select 6 for early V10 machinesWelcome to using Coolpi Development Board! ------------------------------------------ Please enter a number to select your machine 1. cp4b 2. cp4b-hdmi-in 3. cm5-evb 4. cm5-evb-v11 5. cm5-minipc 6. cm5-notebook 7. cm5-notebook-v20 8. cm5-8uart 9. cpnano 10. exit Enter option number: 6 -
@george Thanks that solved my problem.
-
I lost the PD charging after flashing to the Ubuntu system. Then I flash the Armbian system, but it couldn't boot up or enter the UMS mode.
-
@yfblock
Is your machine currently unable to enter UMS mode? It is possible that the file system of EMMC is damaged. You can find a USB drive and create an image of Ubuntu to it. Then, start the system from the USB drive and format EMMC in the system. Use the following command:sudo mkfs.ext4 /dev/mmcblk0 -
I Download the image form onedrive(path: CoolPi CM5 NOTEBOOK/ubuntu/20231027...), but it couldn't start.
-
@yfblock
The partition format of Armbian is different from Ubuntu, so it is recommended to format EMMC before upgrading the image when switching between the two systems. -
@george i can't enter any system. Even through USB drive.
-
@yfblock
Test several USB drives and find a USB 2.0 interface drive. There may be compatibility issues with USB3.0. -
@george Thank you, I have solved this problem using usb2.0 drive. I have another question. What should I do to install the system on NVME? (This message was sent by coolpi notebook).
-
@yfblock
At present, the Uboot section has not added support for NVME, so it cannot be supported at the moment. We will provide support steps after the Uboot driver update. Thank you for your support. -
I replaced the board in my laptop with the newer one and compiled the firmware, but now i have two wlan adapters showing and no bluetooth available.
-
@Momo-0
Run the following command and send the result.lsusb -
-
@Momo-0
From the log information, it appears that the USB Bluetooth network card was not recognized. It is recommended to remove the core board, remove the WIFI module, clean the gold finger with an eraser, and then install and retest. -
@george i cleaned the contacts on the wlan card and the main processor card, still the usb bluetooth card doesnt show up maybe the board is faulty?
-
@Momo-0
I'm really sorry, this board was tested before it was shipped, and it could also be caused by an abnormality during transportation. I will arrange to send you a new one. Because it is currently the May Day holiday, it may need to be processed after the holiday. I deeply apologize for the trouble I have caused you. -
@george i also have ubuntu showing two realtek wlan devices, maybe thats a clue to something?
Also i compiled for V20 since i replaced the motherboard -
@Momo-0
Two WLAN nodes are normal, and the default configuration for drivers is to generate two nodes, even one node can be used. -
I want to try the Kylin system in Baidu Pan, but unfortunately, I can't start it. Now the problem is that I can't enter MUS mode by quickly pressing the power button 8 times. No matter how I start or try, it keeps showing the logo and then rebooting repeatedly. Is there any other way for me to reflash the system?
-
@guyii
From the phenomenon you described, it appears that the onboard EMMC partition table has been damaged. Try formatting the onboard EMMC memory according to the following operation method. After successful completion, you can enter UMS mode normally.- Find a USB drive and use an etcher to create an image of Ubuntu on it. Remember to back up important data from the USB drive before creating it.
- Insert the USB drive into the USB port of the laptop and start the machine. If everything goes smoothly, the machine will successfully boot from the USB drive.
- Use commands to format onboard EMMC memory
sudo mkfs.ext4 /dev/mmcblk0- Remove the USB flash drive and press and hold the power button for 10 seconds to forcibly shut down the machine.
- Connect the TypeC port to the X86 computer and press the power button multiple times to enter UMS mode.
-
@guyii
Firstly, create a system image to a USB drive or a portable hard drive using the etcher. Then, insert the computer and start it up. The machine will first start from the USB drive. After entering the system, format the EMMC using the following command to enter UMS mode again.sudo mkfs.ext4 /dev/mmcblk0 -
Referenced by M mainbord
-
I received the V20 mainboard and installed it. I followed these instructions including pulling, compiling and installing the latest kernel source, and the system boots fine, however it does not recognize the NVMe card.
-
@george would you mind taking a look at this issue. I have not been able to find the instructions specific to the V20 board upgrade, so I may have missed something. I've pulled the notebook apart again and reseated the NVMe stick. I installed Ubuntu 24.04, but maybe I should have used 22.04?
-
@george Never mind. It just started working. No clue why, but I'll monitor it and let you know if it starts to get flaky.
-
@george 一开始 进入 UMS模式,用另一台电脑用 balenaEtcher 刷最新的Ubuntu镜像,中途另一台电脑故障死机,刷机失败。
之后coolpi笔记本无法进入UMS模式,用64GB USB2.0的sandisk U盘刷了最新的Ubuntu镜像后,插上coolpi笔记本后开机,能看到Ubuntu启动logo,之后就是一直黑屏状态,也无法用 Ctrl + Alt + F1(到F12) 切换到控制台模式。U盘刷Ubuntu的内核5.10版本的那个,也是最终黑屏状态。这个如何恢复?
制作启动U盘的,是用linux 的 dd命令写入img镜像文件的
-
This post is deleted! -
@berkaroad 你把u盘镜像插电脑重新修改下分区label,再将extlinux.conf参数匹配上
-
@大法师 谢谢提醒,搞定了!
u盘的两个分区的label都改了下,extlinux下的配置文件改为第二分区的label;修改fstab文件,挂载的boot分区改为按label查找的第一分区的label。 -
Referenced by M mtiqbal